Tracer Light and Tracer rise are high performance garments engineered to control muscle undulation and enhance physiological response systems. The garment is highly compressive, But made with a LightWeight fabric to reduce water absorption and drag while swimming.
Be careful while putting the garment on, as the nature of a LightWeight, high performance suit requires time and caution to put on properly. Follow the instructions below to keep your tracer suit in optimum condition and avoid any accidental damage.
All TRACER suits should be used for competition only and are subject to a limited number of swims.
TRACER fitting guide
- Place one leg in the suit, making sure seams are correctly positioned at the sides of the legs.
- To get the suit over the ankle, gently work the ankle opening over the foot to just above the ankle.
- Ensure the ankle opening is high enough up the leg to enable the rest of the suit to be pulled up fully, and sit correctly on the body.
- Gently pull up the suit to just above the knee making sure the material is pulled tight and there are no creases. We recommend pulling with a wide grip across seams, as the seams are the strongest part of the suit. pulling directly on the fabric may result in damage to the suit.
- Repeat the process for the other leg, correctly positioning seams and gently pulling the remainder of the suit just above the knee, taking care to eliminate all of the creases.
- Once the suit is past the knee on both legs, begin pulling it up bit by bit, alternately up each leg.
- Avoid using your fingernails to pull on the suit. pull the suit up with the care that you would use with a delicate fabric.
- Before attempting to pull the suit over your rear ensure that the legs have been fully pulled up to the top of the thighs and crotch.
- Then hitch the suit up over your rear and arrange the top of the legs, crotch and seams of the suit so it is comfortable.
- To fit over the torso, continue gently pulling the suit over the abdomen and lower back until the armholes can be fitted.
- Be careful while putting arms through the armholes and over the shoulders. some final adjustments may be made in the length of the suit once the arms are through as skin can restrict the ease of the fabric sliding into proper positions.
- Make final leg and torso fit adjustments before zipping up the back. When zipping the zipper, be sure to arch your back and squeeze shoulder blades together so the zipper does not make any contact with the skin and snag.
- Upon first contact with water, the fabric is highly hydrophobic and will naturally repel water on the inside and outside of the garment. We recommend full submersion and squeezing out any water bubbles that accumulate due to the water repellant coating.
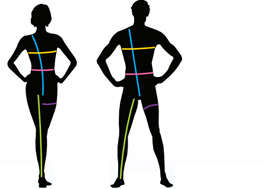
Measurement Guide
![]() Body Loop*
Body Loop*
Place beginning of tape measure on the middle of the shoulder.
Run tape measure over the fullest part of your bust down between
your legs and up your back to the starting point on your shoulder
![]() Chest
Chest
Measure over the fullest part of your bust and around your back.
![]() Waist
Waist
Stand straight, measure around your natural waist (navel).
![]() Inside Leg
Inside Leg
Ensure tape measure sits as high in the groin as possible, then
measure down to ankle bone.
![]() Thigh
Thigh
Measure the widest part of the thigh.
*Long suits are 6cm larger on the body loop circumference


